How to Read Woodworking Plans: Drawings, Cut Lists and Lumber Sizes
A good woodworking plan answers three questions: what the finished piece looks like, what parts you need and at what size, and what order to put them together in. Once you know where each answer lives on the page, any plan becomes easy to follow.
1. The drawings
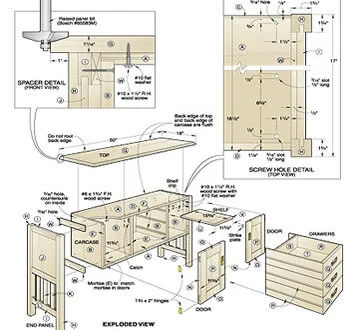
- Overall view. A 3D sketch or photo of the finished piece, with its main sizes: height, width and depth.
- Orthographic views. Front, side and top drawn flat, each showing true dimensions. Hidden edges are often drawn as dashed lines.
- Exploded view. The parts pulled apart along the lines they join on. Each part usually has a letter or number that matches the cut list.
- Detail views. Close-ups of a tricky joint, such as a dado, a rabbet or a mortise and tenon, drawn at a larger scale.
2. The cut list and materials list
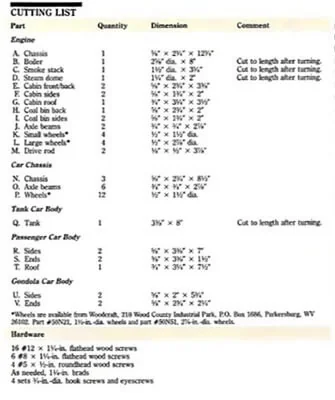
The cut list is a table of every part: its label, how many you need, and its finished thickness × width × length. The materials list (or shopping list) tells you what to buy, such as boards, plywood sheets, screws, glue and hardware.
- Cut-list sizes are usually finished sizes. Cut a little long, then trim to fit where the plan says “cut to fit.”
- Check the order of the dimensions. Most plans list thickness, then width, then length, and length runs along the grain.
- Group parts that come from the same board, and plan your cuts on paper to waste less.
3. Nominal vs. actual lumber sizes
In North America, softwood construction lumber is sold by nominal size, which is bigger than the board you actually get after drying and planing. The plan may use either, so check which one it means.
| Nominal (what it’s called) | Actual size (approx.) |
|---|---|
| 1×4 | ¾" × 3½" |
| 1×6 | ¾" × 5½" |
| 2×2 | 1½" × 1½" |
| 2×4 | 1½" × 3½" |
| 2×6 | 1½" × 5½" |
| 4×4 | 3½" × 3½" |
Dry, surfaced softwood sizes as given in the American Softwood Lumber Standard (PS 20). Hardwood is often sold by thickness in quarters (for example 4/4 is about 1" rough), so measure what you buy.
Outside the US? In the UK, Canada and Australia, timber may be sold in metric sizes, such as 38 × 89 mm for a stud. Convert the plan before you buy: 1 inch = 25.4 mm.
4. Reading dimensions and fractions
- Feet and inches: 3' 4½" means 3 feet, 4½ inches, or 40½ inches in total.
- Fractions on a US tape usually go down to 1/16". If a plan says 23 ⅝", find 23, then the ⅝ mark (ten sixteenths).
- Dimension lines have arrows or ticks at both ends. Extension lines show which edges they measure between.
- “TYP.” means typical: the same size repeats wherever that feature appears.
- O.C. means “on center,” measured from the middle of one part to the middle of the next, as with slats or studs.
5. Following the build steps
Plans list steps in an order that keeps the work square and lets you reach every screw. Don’t skip ahead. Before each step, find the parts on the exploded view, dry-fit them, and only then glue or fasten. Mark each part with its letter in pencil as you cut it.
6. A 7-point checklist before you cut
- Read the plan from start to finish once.
- Check whether sizes are nominal or actual.
- Compare the cut list with the drawings. Do the totals add up?
- Write a shopping list with about 10–15% extra.
- Check your tools match the joints in the plan.
- Label every part as you cut it.
- Dry-fit before glue, every time.
Practice on a big library. TedsWoodworking says it includes 16,000 plans with drawings and cut lists like the samples above. Read our honest review first, or go straight to the vendor’s site.
See the TedsWoodworking plans →Affiliate link. We may earn a commission at no cost to you. Disclosure
Next, read 10 easy woodworking projects for beginners.